musubi-tuner で FLUX.2 klein の LoRa 作成
FLUX.2 klein 4b は RAM 32 GB、VRAM8GB で余裕をもって LoRA を作成できるが、4b はベースの能力がそれほど高くないので実用性は限られる。
学習画像枚数 * エポック数が 1,000 未満だと不十分。学習画像枚数 * エポック数は 1,500 以上、できれば 3,000 あるといい。
目次
編集モデル学習の考え方
ある画像編集は簡単にできるが、その逆変換は難しいことがある。例えばカラー画像のグレースケール化は簡単だが、その逆は難しい。編集モデル学習の威力は、この困難な逆変換を学習できることにある。
キャプション作成
VLM でキャプションを作成する。今回は LM Studio で Qwen3-VL-8B-Instruct-Q4_K_M.gguf を使った。これは NSFW 画像のキャプション付けには使えない。なお稀に同じ文章を繰り返し出力する場合があるので、キャプションファイルサイズを監視したり、繰り返し検知スクリプトを実行したりする必要がある。
すでにタグリストがある場合、タグリストをプロンプトに入れると精度が上がる。
LM Studio を使ってフォルダ内の画像のキャプションをつけるスクリプト
python -m pip install openai を実行しておく必要がある。
使い方は python ./main.py "画像があるフォルダのフルパス"
import base64
import os
import sys
from pathlib import Path
from openai import OpenAI

MAX_TOKENS = 2000

# 1. LM Studio のローカルサーバー設定
client = OpenAI(base_url="http://localhost:1234/v1", api_key="lm-studio")

def ask_vlm(image_path, prompt):
    # 画像ファイルを Base64 文字列に変換する
    with open(image_path, "rb") as image_file:
        base64_image = base64.b64encode(image_file.read()).decode('utf-8')

    # API リクエストの作成
    response = client.chat.completions.create(
        model="local-model", # LM Studio ではモデル名が自動で解決されるため、任意でOK
        messages=[
            {
                "role": "user",
                "content": [
                    {"type": "text", "text": prompt},
                    {
                        "type": "image_url",
                        "image_url": {
                            "url": f"data:image/jpeg;base64,{base64_image}"
                        },
                    },
                ],
            }
        ],
        max_tokens=MAX_TOKENS,
    )

    return response.choices[0].message.content

def inference(img_path:str, dir_path:str):
    p_file = Path(img_path)
    #user_prompt = "この画像の内容を詳しく説明してください。強調マーク ** を使用しないでください。"
    user_prompt = "Please describe the contents of this image in detail. Do not use the emphasis mark **."
    tag_file_path = f"{dir_path}/{p_file.stem}.txt"
    if os.path.exists(tag_file_path):
        with open(tag_file_path, "r", encoding='utf-8') as f:
            tags = f.read()
            #user_prompt = f"{user_prompt}\n\n以下のタグを可能な限り拾って、説明に反映させてください。タグのリストをそのまま出力しないでください。\n\n# tags\n\n{tags}"
            user_prompt = f"{user_prompt}\n\nPlease collect as many of the following tags as possible and incorporate them into the description. Do not output the list of tags as-is.\n\n# tags\n\n{tags}"

    try:
        result = ask_vlm(f"{dir_path}/{img_path}", user_prompt)

        # タグファイルの保護
        if os.path.exists(tag_file_path):
            os.rename(src=tag_file_path, dst=f"{dir_path}/{Path(tag_file_path).stem}.orig.txt")

        with open(f"{dir_path}/{p_file.stem}.txt", "w", encoding='utf-8') as f:
            print(result, file=f, end="")

    except Exception as e:
        print(f"エラーが発生しました: {e}")

if __name__ == "__main__":
    if len(sys.argv) != 2:
        print('python main.py [ディレクトリのフルパス]')
        sys.exit(1)

    dir_path = sys.argv[1]
    files = [ Path(f) for f in os.listdir(dir_path) if os.path.isfile(os.path.join(dir_path, f)) ]
    files = [ f for f in files if f.suffix in ['.png', '.jpg', '.jpeg', '.webp'] ]
    for f in files:
        inference(img_path=f, dir_path=dir_path)
文字化け
文字化けテキストファイル検出スクリプト
from pathlib import Path
import os

dir_path = r"データセットのフルパス"
files = [ Path(f) for f in os.listdir(dir_path) if os.path.isfile(os.path.join(dir_path, f)) and Path(f).suffix == ".txt" ]

for file_path in files:
    line_number = 1
    errors = []

    try:
        with open(f"{dir_path}/{file_path}", 'rb') as f:  # バイナリモードで開く
            for line in f:
                try:
                    line.decode('utf-8')  # 行ごとにUTF-8でデコード
                except UnicodeDecodeError as e:
                    errors.append(f"行 {line_number}: {e}")
                line_number += 1
    except FileNotFoundError:
        print(f"ファイル {file_path} が見つかりません。")
        continue

    if errors:
        print(f"{file_path} に文字化けあり。")
キャプションファイル一括編集
キャプションファイルの頭に文章追加
Powershell
ls *.txt|%{echo "追加したい文章をここに入れる`n`n$(Get-Content -Path $_ -Raw -Encoding Default)" | Out-File -FilePath $_ -NoNewLine -Encoding Default}
Bash
for i in *.txt; do echo -e "ここに追記したい文章を入れる\n\n $(cat $i)" > "$i"; done
環境構築
構築する環境
- Python 3.12。公式は Python 3.10 で検証している
- cu128
- torch==2.9.0。FlashAttention の cu128 で公開されているのがこのバージョン
- torchvision==0.24.0
ハードウェア等
- WIndows11 24H2
- RAM 32 GB
- RTX3050 8 GB
コマンド
git clone https://github.com/kohya-ss/musubi-tuner
cd musubi-tuner
py -3.12 -m venv venv
./venv/Script/activate
pip install torch==2.9.0 torchvision==0.24.0 --index-url https://download.pytorch.org/whl/cu128
pip install -e .
accelerate
accelerate config
- In which compute environment are you running?: This machine
- Which type of machine are you using?: No distributed training
- Do you want to run your training on CPU only (even if a GPU / Apple Silicon / Ascend NPU device is available)?[yes/NO]: NO
- Do you wish to optimize your script with torch dynamo?[yes/NO]: NO
- Do you want to use DeepSpeed? [yes/NO]: NO
- What GPU(s) (by id) should be used for training on this machine as a comma-seperated list? [all]: all
- Would you like to enable numa efficiency? (Currently only supported on NVIDIA hardware). [yes/NO]: NO
- Do you wish to use mixed precision?: bf16
RAdamScheduleFree
公式ドキュメント。RAdamScheduleFree は学習が高速で性能もよい。学習率・スケジューラー・ウォームアップ不要。
./venv/Script/activate
pip install schedulefree
指定方法
--optimizer_type schedulefree.RAdamScheduleFree
FlashAttention
インストール
./venv/Script/activate
pip install https://huggingface.co/Wildminder/AI-windows-whl/resolve/main/flash_attn-2.8.3%2Bcu128torch2.9.0cxx11abiTRUE-cp312-cp312-win_amd64.whl
指定方法は --sdpa や --xformers の代わりに --flash_attn を指定。
4B
モデル
| モデル | URL |
|---|---|
| DiT | flux-2-klein-base-4b.safetensors |
| VAE | ae.safetensors |
| Text Encoder 1 | model-00001-of-00002.safetensors |
| Text Encoder 2 | model-00002-of-00002.safetensors |
事前キャッシング
VRAM が少ない環境なら事前キャッシングは必須。テキストエンコーダーと VAE をロードしなくていいのでメモリの節約になる。
モデルは musubi-tuner/flux2-klein-base-4b に配置してある。toml ファイルの書き方は公式ドキュメントを参照。
この記事では toml ファイルは musubi-tuner/flux2-klein-base-4b/flux2-klein-base-4b.toml とする。
toml ファイル例
control_directory は画像編集学習をするときの参照画像を入れる。例えば control_directory に線画画像を入れておけば、線画の彩色を学習する。カラー画像の線画抽出は FLUX.2 klein 9b でできる。FLUX.2 klein 4b で教師画像を Anime スタイルに変換したものを control_directory に入れておけば、FLUX.2 kleini 4b のアニメスタイルを教師画像の画風に変換する学習が可能。
musubi-tunerでFLUX.2 [klein] 4B 学習 に設定例がある。
# general configurations
[general]
resolution = [960, 544] # optional, [W, H], default is [960, 544]. This is the default resolution for all datasets
caption_extension = ".txt" # optional, default is None. This is the default caption extension for all datasets
batch_size = 1 # optional, default is 1. This is the default batch size for all datasets
num_repeats = 1 # optional, default is 1. Number of times to repeat the dataset. Useful to balance the multiple datasets with different sizes.
enable_bucket = true # optional, default is false. Enable bucketing for datasets
bucket_no_upscale = true # optional, default is false. Disable upscaling for bucketing. Ignored if enable_bucket is false

### Image Dataset

# sample image dataset with caption text files
[[datasets]]
image_directory = "データセットディレクトリのフルパス"
caption_extension = ".txt" # required for caption text files, if general caption extension is not set
resolution = [960, 544] # required if general resolution is not set
batch_size = 1 # optional, overwrite the default batch size
num_repeats = 1 # optional, overwrite the default num_repeats
enable_bucket = true # optional, overwrite the default bucketing setting
bucket_no_upscale = true # optional, overwrite the default bucketing setting
#cache_directory = "/path/to/cache_directory" # optional, default is None to use the same directory as the image directory. NOTE: caching is always enabled
#control_directory = "/path/to/control_dir" # optional, required for dataset with control images
Latents のキャッシュ
./venv/Script/activate
python src/musubi_tuner/flux_2_cache_latents.py --dataset_config "flux2-klein-base-4b/flux2-klein-base-4b.toml" --vae "flux2-klein-base-4b/ae.safetensors" --model_version klein-base-4b
以下のようなエラーが出る場合はダウンロードする VAE を間違えている。
RuntimeError: Error(s) in loading state_dict for AutoEncoder:
        Missing key(s) in state_dict:
Text Encoder のキャッシュ
./venv/Script/activate
python src/musubi_tuner/flux_2_cache_text_encoder_outputs.py --dataset_config "flux2-klein-base-4b/flux2-klein-base-4b.toml" --text_encoder "flux2-klein-base-4b/model-00001-of-00002.safetensors" --batch_size 16 --model_version klein-base-4b --fp8_text_encoder
VLM が OCR したときに文字化けした文字を出力することがあり、その場合以下のようなメッセージを出して処理が止まる。
UnicodeDecodeError: 'utf-8' codec can't decode byte 0x81 in position 2085: invalid start byte
速度
バッチサイズ 16 の時の VRAM 使用量は 6.5 GB。速度は2it/s 程度。
学習
./venv/Script/activate
accelerate launch --num_cpu_threads_per_process 1 --mixed_precision bf16 src/musubi_tuner/flux_2_train_network.py \
    --model_version klein-base-4b \
    --dit "flux2-klein-base-4b/flux-2-klein-base-4b.safetensors" \
    --vae "flux2-klein-base-4b/ae.safetensors" \
    --text_encoder "flux2-klein-base-4b/model-00001-of-00002.safetensors" \
    --dataset_config "flux2-klein-base-4b/flux2-klein-base-4b.toml" \
    --sdpa --mixed_precision bf16 \
    --fp8_base --fp8_scaled \
    --timestep_sampling flux2_shift --weighting_scheme none \
    --optimizer_type adamw8bit --learning_rate 1e-4 --gradient_checkpointing --gradient_checkpointing_cpu_offload \
    --blocks_to_swap 12 \
    --max_data_loader_n_workers 2 --persistent_data_loader_workers \
    --network_module networks.lora_flux_2 --network_dim 16 \
    --max_train_epochs 10 --save_every_n_epochs 4 --seed 42 \
    --output_dir "flux2-klein-base-4b/outputs" --output_name style-lora
以下のようなエラーが出る場合はダウンロードするモデルを間違えている。
RuntimeError: Error(s) in loading state_dict for Flux2:
        Missing key(s) in state_dict:
Block Swap
| モデル | 最大 --blocks_to_swap |
|---|---|
| dev | 29 |
| klein-base-9b, klein-9b | 16 |
| klein-base-4b, klein-4b | 13 |
リソース消費量
- 解像度:960 x 544
- Aspect Ratio Bucketing 有効
- 230 枚 * 10 エポック
- バッチサイズ:1
- VRAM 使用量: 3.7 GB
- RAM 使用量: 18.3 GB
- 学習速度:8.75 s/it
- 学習にかかった時間:5時間 30 分
結果
蒸留モデル(FLUX.2 klein 4b)に LoRa の strength を 1 で適用して、10 step で生成するとちょうどよくなった。ただし細部が溶けるので、解像度はもっと増やした方がいい。
学習2
解像度を変更したので VAE のキャッシュを再生成する必要がある。RTX 3050 で解像度 1216 x 1216 の場合、変換速度は 1.9 s/it 程度。
| パラメータ | 旧 | 新 |
|---|---|---|
| 解像度 | 960 x 544 | 1216 x 1216 |
| 学習率 | 1e-4 | 2e-4 |
| エポック数 | 10 | 4 |
accelerate launch --num_cpu_threads_per_process 1 --mixed_precision bf16 src/musubi_tuner/flux_2_train_network.py \
    --model_version klein-base-4b \
    --dit "flux2-klein-base-4b/flux-2-klein-base-4b.safetensors" \
    --vae "flux2-klein-base-4b/ae.safetensors" \
    --text_encoder "flux2-klein-base-4b/model-00001-of-00002.safetensors" \
    --dataset_config "flux2-klein-base-4b/flux2-klein-base-4b.toml" \
    --sdpa --mixed_precision bf16 \
    --fp8_base --fp8_scaled \
    --timestep_sampling flux2_shift --weighting_scheme none \
    --optimizer_type adamw8bit --learning_rate 2e-4 --gradient_checkpointing --gradient_checkpointing_cpu_offload \
    --blocks_to_swap 12 \
    --max_data_loader_n_workers 2 --persistent_data_loader_workers \
    --network_module networks.lora_flux_2 --network_dim 16 \
    --max_train_epochs 4 --save_every_n_epochs 4 --seed 42 \
    --output_dir "flux2-klein-base-4b/outputs" --output_name flux2-4b-style-lora
リソース消費量
- 解像度:1216 x 1216
- Aspect Ratio Bucketing 有効
- 230 枚 * 4 エポック
- バッチサイズ:1
- VRAM 使用量: 5.8 GB
- RAM 使用量: 20.6 GB
- 学習速度:23.4 s/it
- 学習にかかった時間:6時間
4b 結果2
参照画像なしで学習させたが、参照画像を入力して「Restyle the image to トリガーワード.」とすると画風変換ができるようになった。線画を入力し「Coloring the image to トリガーワード.」とすると色使いがコピーできる(線は変わらない)。
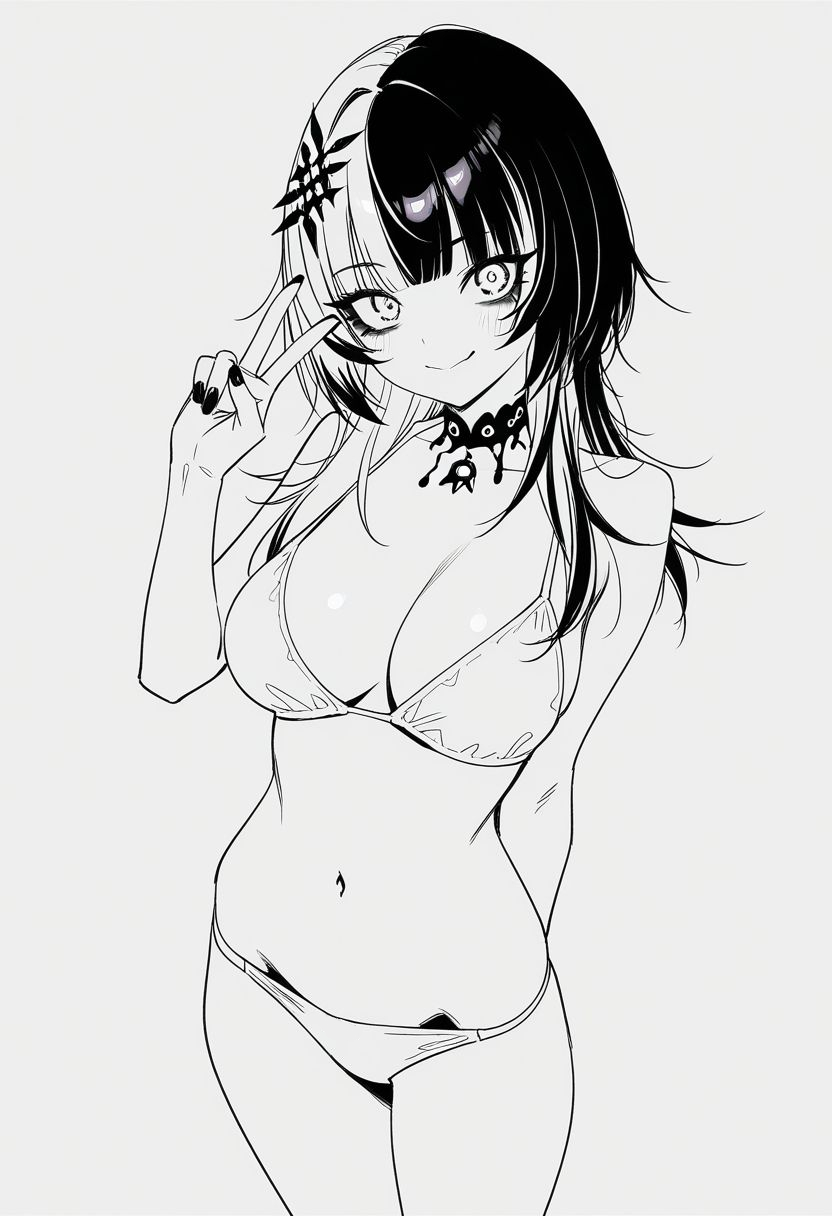
image 1

FLUX.2 klein 4b
8 steps

FLUX.2 klein 4b + LoRa
8 steps
Coloring the image to トリガーワード.

Her *hair color* is black and white.

Background is the beach at noon. High angle.
学習3
基本設定は学習2と同じ。ただし、RAdamScheduleFree と FlashAttn 使用。データセット枚数は 29 枚。
accelerate launch --num_cpu_threads_per_process 1 --mixed_precision bf16 src/musubi_tuner/flux_2_train_network.py \
    --model_version klein-base-4b \
    --dit "flux2-klein-base-4b/flux-2-klein-base-4b.safetensors" \
    --vae "flux2-klein-base-4b/ae.safetensors" \
    --text_encoder "flux2-klein-base-4b/model-00001-of-00002.safetensors" \
    --dataset_config "flux2-klein-base-4b/flux2-klein-base-4b-v2.toml" \
    --flash_attn --mixed_precision bf16 \
    --fp8_base --fp8_scaled \
    --timestep_sampling flux2_shift --weighting_scheme none \
    --optimizer_type schedulefree.RAdamScheduleFree --learning_rate 2e-4 --gradient_checkpointing --gradient_checkpointing_cpu_offload \
    --blocks_to_swap 12 \
    --max_data_loader_n_workers 2 --persistent_data_loader_workers \
    --network_module networks.lora_flux_2 --network_dim 16 \
    --max_train_epochs 30 --save_every_n_epochs 10 --seed 42 \
    --output_dir "flux2-klein-base-4b/outputs" --output_name flux2-4b-style-lora-rasf-fa
リソース消費量
- 解像度:1216 x 1216
- Aspect Ratio Bucketing 有効
- 29 枚 * 30 エポック
- バッチサイズ:1
- VRAM 使用量: 6.7 GB
- 共有 GPU メモリ:1.1 GB
- RAM 使用量: 19 GB
- 学習速度:17 s/it(FlashAttention なしだと 23.4 s/it)
- 学習にかかった時間:4時間
学習4
学習3から解像度を 1216 x 1216 から 896 に下げ、エポック数を 100 にし、バッチサイズを2にした。
accelerate launch --num_cpu_threads_per_process 1 --mixed_precision bf16 src/musubi_tuner/flux_2_train_network.py \
    --model_version klein-base-4b \
    --dit "flux2-klein-base-4b/flux-2-klein-base-4b.safetensors" \
    --vae "flux2-klein-base-4b/ae.safetensors" \
    --text_encoder "flux2-klein-base-4b/model-00001-of-00002.safetensors" \
    --dataset_config "flux2-klein-base-4b/flux2-klein-base-4b-896.toml" \
    --flash_attn --mixed_precision bf16 \
    --fp8_base --fp8_scaled \
    --timestep_sampling flux2_shift --weighting_scheme none \
    --optimizer_type schedulefree.RAdamScheduleFree --learning_rate 2e-4 --gradient_checkpointing --gradient_checkpointing_cpu_offload \
    --blocks_to_swap 12 \
    --max_data_loader_n_workers 2 --persistent_data_loader_workers \
    --network_module networks.lora_flux_2 --network_dim 16 \
    --max_train_epochs 100 --save_every_n_epochs 30 --seed 42 \
    --output_dir "flux2-klein-base-4b/outputs" --output_name flux2-4b-style-lora-896
リソース消費量
- 解像度:896 x 896
- Aspect Ratio Bucketing 有効
- 29 枚 * 100 エポック
- バッチサイズ:2
- VRAM 使用量: 7.6 GB
- 共有 GPU メモリ:1.1 GB
- RAM 使用量: 22 GB
- 学習速度:12.7 s/it(解像度 1216・バッチ1だと 23.4 s/it)
- 学習にかかった時間:8時間
結果
t2i、画像編集ともに 30 エポックより精度が上がった。特に t2i での再現率が向上した。
9B
モデル
| モデル | URL |
|---|---|
| DiT | flux-2-klein-base-9b.safetensors |
| VAE | ae.safetensors |
| Text Encoder 1 | model-00001-of-00004.safetensors |
| Text Encoder 2 | model-00002-of-00004.safetensors |
| Text Encoder 3 | model-00003-of-00004.safetensors |
| Text Encoder 4 | model-00004-of-00004.safetensors |
Latents のキャッシュ
./venv/Script/activate
python src/musubi_tuner/flux_2_cache_latents.py --dataset_config "flux2-klein-base-9b/flux2-klein-base-9b.toml" --vae "flux2-klein-base-9b/ae.safetensors" --model_version klein-base-9b
推論速度は 1.25 s/it 程度。
Text Encoder のキャッシュ
VRAM8GB では OOM になる。flux_2_cache_text_encoder_outputs.py の 38 行目あたりの
device = args.device if args.device is not None else "cuda" if torch.cuda.is_available() else "cpu"
を
device = "cpu"
に変更すると CPU 動作させられる。ただし Ryzen 5 2600 で 330 s/it と遅すぎる推論速度。画像枚数が少ない場合は許容できるかもしれない。
コマンド
python src/musubi_tuner/flux_2_cache_text_encoder_outputs.py --dataset_config "flux2-klein-base-9b/flux2-klein-base-9b.toml" --text_encoder "flux2-klein-base-9b/model-00001-of-00004.safetensors" --batch_size 32 --model_version klein-base-9b --fp8_text_encoder
使用リソース
- 画像枚数 29 枚
- バッチサイズ:32
- CPU 使用率:60%
- RAM 使用量:19 GB
学習
accelerate launch --num_cpu_threads_per_process 1 --mixed_precision bf16 src/musubi_tuner/flux_2_train_network.py \
    --model_version klein-base-9b \
    --dit "flux2-klein-base-9b/flux-2-klein-base-9b.safetensors" \
    --vae "flux2-klein-base-9b/ae.safetensors" \
    --text_encoder "flux2-klein-base-9b/model-00001-of-00004.safetensors" \
    --dataset_config "flux2-klein-base-9b/flux2-klein-base-9b.toml" \
    --sdpa --mixed_precision bf16 \
    --fp8_base --fp8_scaled \
    --timestep_sampling flux2_shift --weighting_scheme none \
    --optimizer_type adamw8bit --learning_rate 2e-4 --gradient_checkpointing --gradient_checkpointing_cpu_offload \
    --blocks_to_swap 15 \
    --max_data_loader_n_workers 2 --persistent_data_loader_workers \
    --network_module networks.lora_flux_2 --network_dim 16 \
    --max_train_epochs 30 --save_every_n_epochs 10 --seed 42 \
    --output_dir "flux2-klein-base-9b/outputs" --output_name flux2-9b-style-lora
リソース消費量
- 解像度:1024 x 1024
- Aspect Ratio Bucketing 有効
- 29 枚 * 30 エポック
- バッチサイズ:1
- VRAM 使用量: 7.7 GB
- 共有 GPU メモリ 1.8 GB
- RAM 使用量: 28 GB
- 学習速度:33 s/it
- 学習にかかった時間:8時間
9B の結果
参照画像なしで学習させたが、参照画像を入力して「Restyle the image to トリガーワード.」とすると画風変換ができるようになった。線画を入力し「Coloring the image to トリガーワード.」とすると色使いがコピーできる(線は変わらない)。
4b より学習解像度もステップ数も少ないのに、再現度も線の品質も 9b が上回っている。
image 1
FLUX.2 klein 4b + LoRa
8 steps

FLUX.2 klein 9b + LoRa
10 steps
Coloring the image to トリガーワード. *Keep the input lines and black tone*.

Her *hair color* is black and white.

Background is the beach at noon. High angle.